
Proper set up now will save time and money later!
Color Printing Systems accepts all major formats, including print-ready PDF, InDesign, Quark XPress, as well as many legacy formats such as Freehand or PageMaker. Before releasing a project to go to print, there are a few things you want to make sure of before handing it off.
Color Mode
Are all images and files CMYK or Grayscale? Are the proper PMS colors defined if necessary for the job?
Resolution
Are all images at least 300 dpi? Is all line-art either vector or greater than 600 dpi?
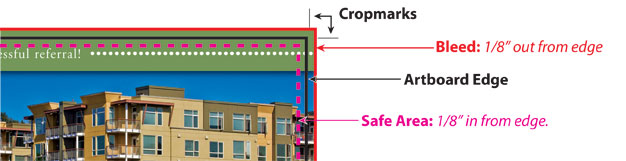
Bleeds
Wherever color is supposed to go all the way to the edge of the paper, you must extend the art past the edge of the page 1/8".
Safe Area
All type and critical elements should be placed at least 1/8" away from the edge of the piece.
Score Marks
If your job is intended to fold, or be perforated you must add score marks on your file. The marks should be placed outside of the bleed using the color "registration".
Trim Marks
If providing a PDF file, make sure the file contains trim (crop) marks to the appropriate size.
Fonts
PDF files should be output (or distilled) with all fonts embedded, including base-13 fonts.
If you are providing a native file, make sure you include any fonts used along with the document. Using the native application's "Package" or "Collect for Output" feature will do this for you.
Alternately, you may simply save a version with the fonts "converted to outlines" in order to avoid missing font problems.
Images
If you are providing a native file, be sure to also include a links folder with any images used in your artwork. The native application's "Package" or "Collect for Output" feature will do this for you.
Overprinting
Unless you are an experienced designer with a working knowledge when to use "overprinting", make sure that it is never checked on any of the objects in your files. White objects that are set to overprint will disappear when separated to CMYK, even if they show up on a PDF.
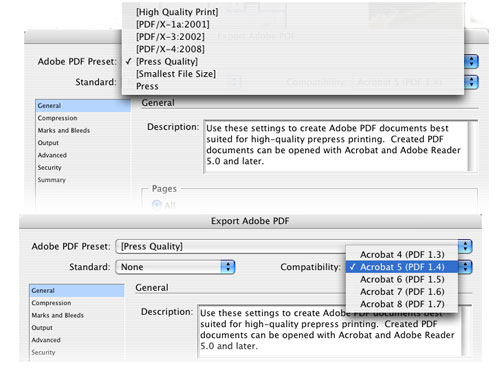
Exporting a PDF
When exporting a .pdf file, set your PDF Preset to [Press Quality], and the compatibility to Acrobat 5. Also be sure to correctly set the Marks and Bleeds setting to fit your file. Bleeds should be set to .125".
Resolution - DPI or Dots Per Inch
Using low dpi (dots per inch) images is a common mistake which can result in a low quality printed piece. Screen resolution is accepted as 72 dpi, and print resolution is at least 300 dpi. So even if it appears that the image looks great on screen, it may not look acceptable once printed.
Images printed below 300 dpi usually look pixelated or blurry. One easy way to check whether or not your images are at print quality if you have them placed in InDesign is to check the "effective ppi" in the Links palette in InDesign (Window->Links) under the Link Info dropdown. Another way is to open them in Photoshop, and open the "Image Size" menu. The "document size" box will give you the dimensions and the resolution. If your file resolution is below 300, uncheck the "resample image" box and change the resolution to 300. The new dimensions will be the minimum print size of your image.
Simply changing your dimensions to the desired size, then resampling the resolution up to 300 dpi will not result a higher quality image. Resising images smaller while leaving the "resample image" box unchecked will increase the resolution and quality of an image, provided the image is printed at that smaller size.
When saving images out of Photoshop, you should use TIFF format files with compression enabled instead of JPEG format. JPEG compression degrades image quality and will result in blocky or pixelated artifacts which can show up undesirably on press. If you have images with transparency, the files should be saved as PSD files, not PNG files. PNG files are intended for use on web pages or electronic media only and do not always produce the expected results in printed pieces. Alternately, transparent TIFF files can be used by some applications as well.
Transparency Issues
Simple steps to avoid common transparency problems!
Normal transparency issues can be resolved before saving your file. Most transparency issues are caused by using a feature, such as a shadow or glow on a spot color. Remember to change any spot colors to the correct CMYK build if the job is printing as 4-color process.
If you need a lighter shade of a PMS color, use the color slider to select the proper color instead of the opacity feature.
Always carefully scrutinize your print-ready PDF file before sending it, using Acrobat's Output Preview. You can catch most errors that would show up in print before they become costly problems.
Avoid Overprint Issues.
Overprint will cause unexpected results in color if used improperly.
Primarily used to intentionally overlap inks, improperly enabling overprint on objects can cause unexpected results. Please turn all overprint objects off before submitting your files, if you are not familiar with it's usage. Having an object set to overprint will cause any color plates with 0% ink not to knock the color beneath out to white on that specific plate. Unexpected results may occur if you have accidentally set objects to overprint. You can verify most overprint results by using Acrobat's Output Preview with Overprint Simulation turned on, or in InDesign using the Separations Preview palette with separations turned on.
| A5 |
5.8 x 8.3 inches |
| A4 | 8.3 x 11.7 inches |
| A3 | 11.7 x 16.5 inches |
| A3+ | 13 x 19 inches |
| A2 | 16.5 x 23.4 inches |
| A1 | 23.4 x 33.1 inches |
| A0 | 33.1 x 46.8 inches |
| Legal | 8.5 x 14 inches |
| B (ledger) | 11 x 17 inches |
| Super B/Super A3 | 13 x 19 inches |
| C | 17 x 22 inches |
| D | 22 x 34 inches |
| E | 33 x 34 inches |
Standard Envelope Types and Sizes.
Color Printing Systems offers all types of evnelopes in many different stocks, colors and sizes. Click on any of the envelopes below to view sizing charts to assure you select the correct size for your project.


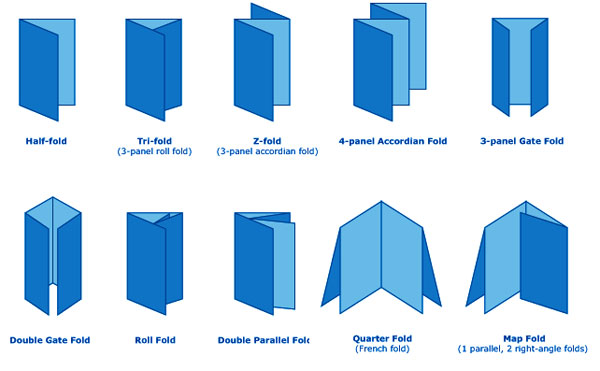
Common brochure folding options.
Color Printing Systems offers a wide variety of folding options. If you don't find the perfect folding option below, give us a call and we'll tell you the best way to complete you project!
Color Modes
One of the most common mistakes with new designers is setting up files with the incorrect color space. Remember, you should always start and finish your designs using the CMYK color space. Providing a file to Color Printing Systems which was created or saved in an RGB color space may result in a color shift that will cause your job to have unexpected or incorrect colors.
Raster images, such as jpeg or tiff images will normally come from the camera in RGB or RAW mode. Remember to convert the color in Photoshop to CMYK, or Grayscale depending on whether or not your job is full color or black ink only. The safest way to ensure the colors come out as the original is to make sure the source RGB profile is used to convert the image to the correct CMYK color space to match the rest of your layout document. When in doubt, use the SWOPv2 CMYK profile.
Pantones
Pantone inks, or spot colors, must be properly named in order for the correct ink to be used for your job. Consult with our prepress department if you have any questions regarding selecting or naming the Pantone color you wish to use. Jobs printed on an uncoated stock must use a PMS (Pantone Matching System) uncoated color definition to appear correctly on screen. Similarly, jobs printed on a coated stock must be defined with a PMS coated color. However, since the same ink is used by number for either, the coated and uncoated specifications only apply to how it appears on screen or proof.
Keep in mind the number of inks used. If you are running a job that has full color images, it is more economical to use a CMYK build of the PMS color if the exact PMS color match isn't necessary.
Black - Rich and Matte
If you are running a 4-color process job, to get the darkest and richest blacks on large solids, use a color build of 60%C, 40%M, 40%Y, 100%K. Single ink 100% black will result in a dull shade of black if used for large areas, and anything it overlaps may show through as it overprints by default. It should always be used for large solid black blocks and for thick solid black type above 18pt.
There is a caveat to rich black objects: Due to how the stay-away trapping and registration process works with offset printing, thin black type and line art should never use rich black. The contrast of thin black objects on a white background will make most them appear darker. It could also cause it to look blurry if the edges of the undercolor (the undercolor is the 60,40,40 below the 100% black) peeks out from below the solid black which gives the type a blurry gray look, instead of a clean sharp dark black look. Rich black objects that are large enough receive stay-away trapping that pulls the undercolor away from the edges, keeping them sharp while still providing undercolor for the solid area.
Do I need to see a proof before I OK my job?
Proofing can be a very important step in ensuring 100% satisfaction with your job. Good proofing always starts with the designer and client. Before involving a printer, you want to be absolutely sure there are no grammar, resolution, color, or layout errors. Depending on the printing process, those easily avoidable errors can be costly, even before the job is on press.
When you are printing with the traditional offset process, the majority of your initial cost is in the set up of the press. That's why it is essential to catch any errors before printing. We recommend utilizing our calibrated inkjet proofing system to catch any remaining potential problems before presstime.
Digital presses are an excellent option for quick turn around time, and low cost. However, they do not produce the same results as an offset lithography press. Because there is very little setup process with digital printing, it is always a good idea to see a proof directly from the digital press to show that the color and quality are exactly what you want.
Bindery and Finishing Services - In House, on Time and on Budget.
Our bindery department has the state-of-the-art equipment to handle any projects including saddle stitching, perfect binding, mechanical binding and tab cutting. Keeping bindery in-house ensures highest quality, on-time delivery and significant cost savings.
Choosing the right bindery and finishing options can be as important as the content of your project. Here are some of the most popular methods to assure your project will have a complete and professional look.
Perfect Binding
A binding process where flexible adhesive attaches a paper cover to the spine. Similar to soft cover book binding.
Saddle stitching
This is the most common stitching method for multiple page printed material. Wire stitching is inserted at the center of your project.
Collation
Assembly of the printed sheets in the proper order for binding.